File upload flows are some of the most business-critical paths in your application. They’re also statistically some of the least covered by automated tests. Not because engineers don’t know they matter. Because automating them reliably is genuinely painful, and at some point, a team lead makes the pragmatic call: manual for now, automate later. Later never comes.
Applitools Autonomous now includes native file upload testing with cloud-managed storage, plain-English authoring, and built-in visual validation.
The Real Failure Modes
Local path dependency. An engineer writes a test referencing /Users/jsmith/testdata/check_front.png. It passes on their machine. It fails everywhere else because that path doesn’t exist. They patch it with preloaded files on remote machines, local tunnels, or test files committed to the repo. The workaround works until a machine gets reprovisioned or someone renames the file.
No shared test data. Two engineers testing the same upload flow use two different PDFs. One is valid. One has a corrupt header. The test is non-deterministic, and nobody trusts it, so nobody fixes it.
Post-upload behavior goes unvalidated. Your test confirms the upload returned HTTP 200. It does not confirm the right image rendered in the deposit preview, the confirmation screen reflects the correct file name, or the form state is correct after attachment.
Here’s the scenario that actually matters: an agent-generated code change subtly breaks the file injection logic in your mobile deposit flow. Your test passes because you’re asserting on the network response, not the UI state. The flow is silently broken in production for four days. You find out from a Slack message from the VP of Product.
What Autonomous Actually Does
Applitools Autonomous solves the infrastructure problem first. Files live in a team-scoped cloud library. When a test runs, locally, in staging, or in CI, Autonomous resolves the file reference from that library and injects it directly into the browser input. The path problem disappears because there is no path.
Storage limits: 100 MB per file, 1 GB total for paid accounts, 300 MB for free trial accounts. Files are scoped by application and team.
During test creation, clicking a file input in the interactive browser opens Autonomous’s own file picker instead of the OS-native one. You select a file from your library. If you haven’t uploaded it yet, click Manage your files, the File Management Dashboard opens in a new tab, you upload there, and you return to your test. For teams using natural language authoring, you can tell Autonomous to “upload file “check-front-1.png” from the file picker”.
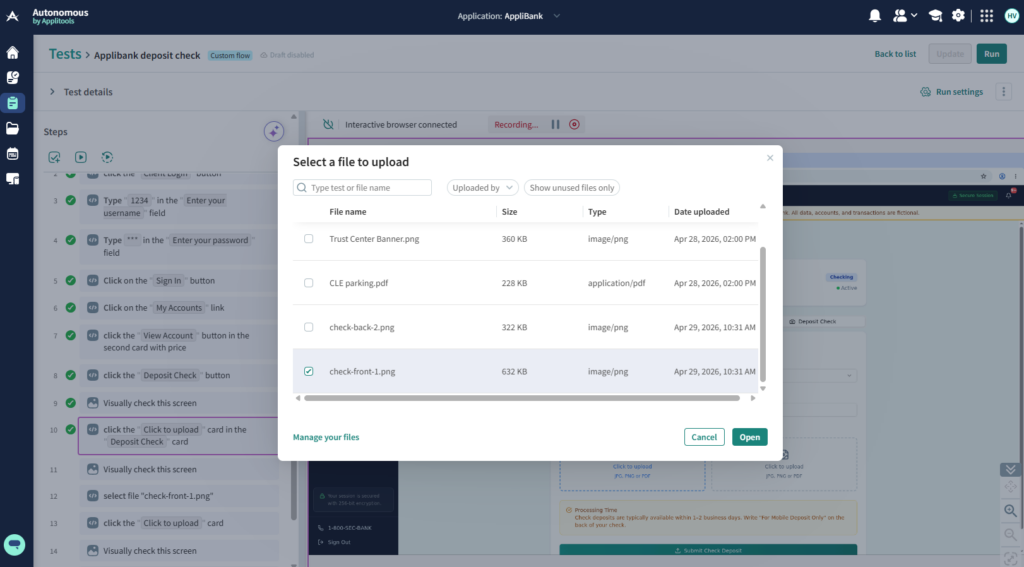
Native input constraints are respected. If your application only accepts .pdf and .png, Autonomous surfaces only compatible files during authoring.
At runtime, the file picker doesn’t appear. Autonomous resolves the stored file reference, injects it into the target input, and logs the outcome.
🎥 See the whole workflow recorded here
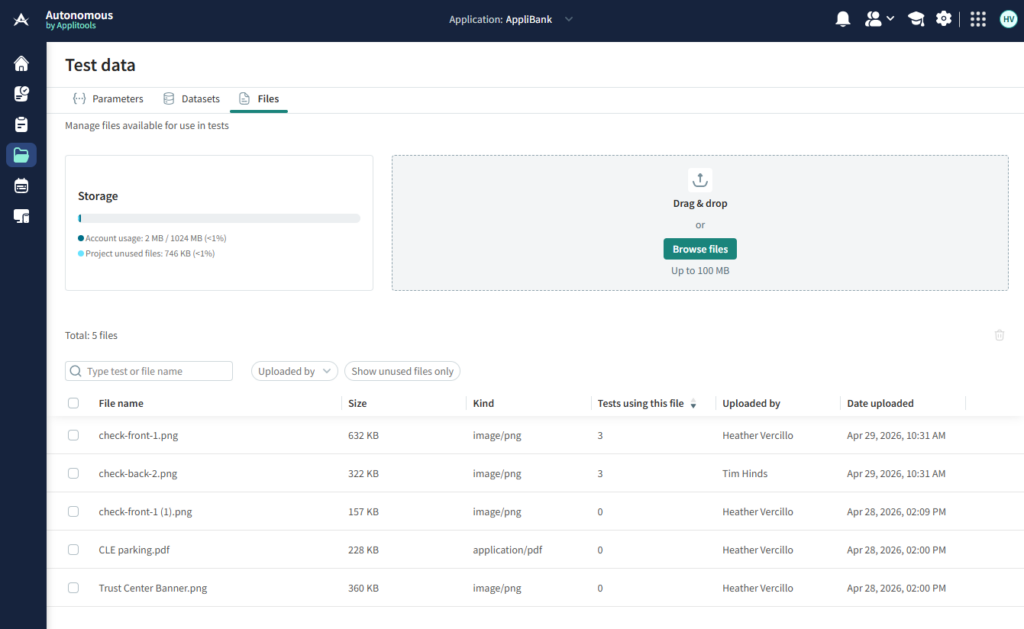
File Management That Doesn’t Break Your Tests
The File Management Dashboard is under Test Data > Files. Three behaviors worth knowing before you build your suite around this:
Rename freely. Files are referenced by internal ID. Renaming updates the display name across every referencing test step. Nothing breaks.
Override to update all tests at once. Upload a new file with the same name as an existing one and Autonomous asks if you want to replace or keep both. Replace it, and every test using that file picks up the new version on the next run with no step reconfiguration needed.
In-use files cannot be deleted. The delete action is disabled on any file referenced by a test. You remove the upload steps first. Without this guardrail, a library cleanup breaks tests in ways that are annoying to diagnose.
Validating the UI After the Upload
Confirming the upload succeeded is not enough. After adding a file upload step, add a visual assertion on the screen that follows. Autonomous compares it against your baseline on every run. If the uploaded image renders incorrectly, the confirmation screen shows the wrong file, or the layout breaks after attachment, the diff surfaces in results.
For the mobile deposit example: upload front-of-check and back-of-check images, then assert on the deposit confirmation screen. The test validates that the correct images are actually displayed and not just that the upload request returned a success code. The failure mode that reaches production is almost always in the rendering layer, not the network layer.
Use the Regions Only match level to scope assertions to a specific element — the uploaded document thumbnail, the preview panel — and ignore everything else. This reduces noise from dynamic content that changes legitimately between runs.
Getting Started
- Navigate to Test Data > Files and upload the files your tests need.
- Open or create a custom flow test. Navigate to the file upload input in the interactive browser.
- Click the input, select your stored file from the Autonomous file picker.
- Add a visual assertion on the screen that follows the upload.
- Run the test. File injection is handled at execution time.
The test runs the same way in every environment from this point forward.
Whether it’s worth adopting depends on how many file upload flows you’re currently testing manually and how often those flows change. If the answer is “several” and “frequently,” the math is straightforward.
Quick Answers
Yes. Applitools Autonomous includes native file upload testing as of Q2 2026. Files are stored in a team-scoped cloud library and injected directly into the browser input at runtime. You author upload steps using plain-English commands or by clicking the file input in the interactive browser. The current release supports one file per step with static file names.
Autonomous supports any file type your application accepts, including PDF, PNG, JPG, CSV, DOCX, and others. The maximum file size is 100 MB per file. Total storage is 1 GB for paid accounts and 300 MB for free trial accounts. Native input constraints defined by your application are respected during authoring, so only compatible file types appear in the file picker.
Renaming a file in the File Management Dashboard automatically updates the display name across every test step that references it. No test reconfiguration is needed because files are referenced by internal ID, not by name. If you replace a file by uploading a new version with the same name, all tests referencing that file use the updated version on the next run without any changes to the test steps.
Yes. After adding a file upload step, you add a visual assertion on the screen that follows. Autonomous compares that screen against your baseline on every run and surfaces any diffs with a side-by-side comparison. This catches rendering failures that a network-level assertion misses, such as the wrong image displaying in a preview panel or the confirmation screen reflecting incorrect file information. Use the Regions Only match level to scope the assertion to a specific element if you want to ignore dynamic content elsewhere on the screen.